Highlighting and Contouring in 10 Easy Steps

Here are my 10 steps for any and every girl to highlight and contour. First- What is it? Highlighting and Contouring are using lighter and darker products to define parts of your face. This is the well known Kardashian makeup trick and #nofilter for your instagrammy pics. Common Mistakes- Highlighting is meant to bring out areas you want to "highlight" or show off. Contour your areas you want to hide, or make smaller. MAKEUP IS SCIENCE AND ART!! Find your skin tones and find a contrast. I have yellow skin tones. If you look at a color wheel, the opposite of yellow is purple/red.. So I use a bronzer with red tones and a highlighter with pink tones.
Also glue goes on paper, paper on glue.. Things we teach first graders... If you put a creamy product on your face, cover it with powder and vice versa If you apply glue on top of glue.. it will slide off.. right? So think creamy, powder, creamy, powder to set your products. 

Step 1- Use a primer! I actually used a drug store product for this.. Neutrogena Healthy Skin Primer. This is very light and has sunscreen!
Step 2- Put on a thin layer of foundation. I use the Beauty Blender to evenly press foundation. I used MAC Studio Fix Foundation.
Step 3- Concealer! I love highlighting. This is where I like to highlight for photos and lighting. You can choose where you want to highlight on your own face, and how much. I use MAC Studio Finish Concealer in a pinkish/white shade to have contrast. Even if I don't highlight and contour all the way, I do the concealer part almost everyday. Especially being a teacher, I always have dark circles I need to cover up. This does the trick.
Step 4- Set your concealer. I use Ben Nye powders or a mineral powder depending on how oily my face is. I use almost a white to pinkish white shade depending on my skin tone. Use a small brush and PAT the powder over top the concealer. Try not to rub to avoid pulling skin over time.
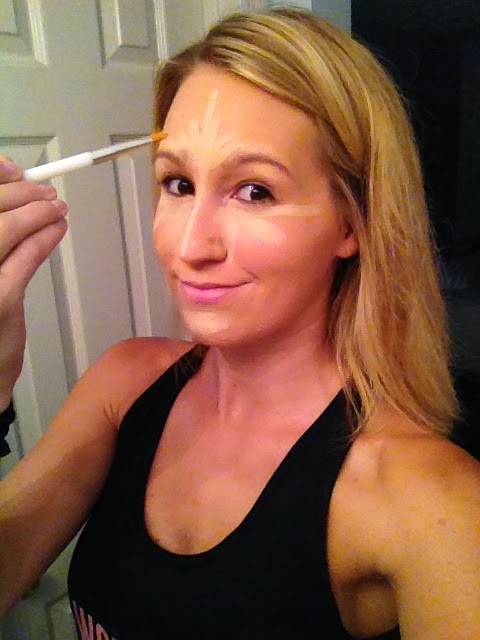
Step 5- Bronzer or Contouring. I do not like my large forehead or wide face (Sorry I'm a typical female) So I contour my cheek bones and forehead. I use small strokes to put a deep line of bronzer in the dent underneath the cheek bones. I use small strokes around my hair line and on my temple, I also do under my chin. I make a "3" on the sides of my face.
Step 6- Highlighting AGAIN!! Don't judge me for over highlighting, I can't help it. I put this step in here to show pictures but this could be a step 8. I use Benefit High Beam (light pink) to highlight on top of contouring, nose, temples, v above top lip, and chin. This adds shine and shimmer.
(I am also setting the highlighter with a powder highlighter too) 

Step 7- (optional) Contour that nose! I dislike my nose. So a draw a small outline around the nose in bronzer to make my nose look smaller in pictures. This tip is keeping plastic surgeons out of business. (In picture above)
 Step 8- Blend! I am using a small wide brush to blend. Blend in circles. You should not be able to see any lines. Blend everything together.
Step 9- Reapply any products if needed. Don't forget to highlight around your brows too. Don't forget blush on your cheeks! Set with powder overall. Spray a finishing spray all over face.

 Step 10- Take an instgram picture and show your makeup off!!

My Starting Line Up


We all have our go-to makeup products.  I love to read blogs and watch YouTube videos on the newest and best products.  I wanted to start my blog off with my everyday, go-to products.  These are the make-up items I can't live without.  I will apologize for most of these products being "high end".  I have tried alternatives and they don't work as well.  Here we go..

1.  MAC Prep and Prime- This product is a thin, lotion primer that goes in your pores to really show your makeup off.  The best part about this product, is it has GLITTER in it! Not a lot, just a hint of shimmer.  This is a little oily, so make sure you use a toner before.  ($30.00)
2.  MAC Studio Fix Foundation-  This is a medium-heavy foundation.  I love foundation and I love having my skin look as flawless as possible.  Studio Fix is my go to foundation for going out and taking selfies.  I will say the Studio Fix foundation adds a rich color to your face to make you look brighter in iPhone photos.  No filter needed with this foundation.  ($27.00)
3.  Makeup Forever HD Foundation-  Now why do I have 2 foundations?  I love this foundation.  This foundation will make my face look flawless in professional photos with great lighting.  This is my go to foundation for game days and professional photography.  However, this foundation is very thick (even though it's stated minimum coverage).  It has pigments to catch lights in HD photos.  It creates a more washed out look for cellphone photos.  But your skin will look flawless.  ($42.00)
4.  Ben Nye Luxury Powder-  I use this powder in Banana because I have more yellow tint to my skin.  They do make this powder in other colors.  This is the Kim Kardashian powder that she uses to add glow and set her highlighting.  I also use this as a finishing powder.  ($14.00)
5.  MAC Studio Fix Concealer- I love, love, love this product.  I could go to a "Highlighters Anonymous" group because I love highlighting.  Now I use more of a pinkish tint concealer because again I have yellowish skin tones.  So you can go as light or as dark with this concealer as you'd like.  I also use a small concealer brush.  ($18.00)
6. Benefit High Beam-  Another great highlighting product.  I even use this as a base for my eye makeup or makeup for work.  I have been using this product for 8 years.  Its light pink with shimmer.  ($26.00)
7.  Benefit Hoola Bronzer-  I love this bronzer.  I use many bronzers to mix up my routine.  This is my favorite because it provides a great brown tone and a hint of SPARKLE.  It's also very thin so you can apply more as needed. ($28.00)
8.  MAC Sunbasque Blush-  This is a blush, but can also be used as a bronzer.  I use this for contouring for photos or game days.  It adds a great brown, redish color and really can be seen from far away.  I don't use this product for everyday wear, just nights out and performing.  ($21.00)
9.  Beauty Blender-  I am on the "Beauty Blender train".  I love this tool.  It really helps evenly apply my foundation, concealer, and highlighter.  I recently found out you can use this tool wet or dry!  They also make a special cleaner for the Beauty Blender.  ($20.00)
10.  Cover Girl Lip Perfection- I use this color in Blush Twist.  Here is a drug store product. I love this because it's a mix of lip stick and lip gloss.  It's very thin and workable.  I like the nude-pink shade for an everyday color.  ($7.99)
11.  MAC Lipstick in "Red"-  If you don't own this color or something similar you're not a real woman!  Every girl should own red lipstick.  I love wearing it out on the town.  It's a matte finish and lasts the whole evening!  ($ 16.00)
12.  Loreal Voluminous Mascara-  This is my go-to mascara.  I have tried 100 mascaras.  I love many of them.  I will say I use a lot of mascara, and I don't like clumpy eyelashes.  #1 pet peeve of Alyson... spider eyelashes.  So this mascara is cheap, easy to work with, and doesn't clump.  I'm still open for opinions.  I would love to try some 3D fiber mascara also. (Send me some, hint hint).   ($ 7.99)
13.  NARS Orgasm Blush-  I have shown the powder and stick form.  I love them both.  I know this is cliche because everyone loves this blush.  This is just my go-to blush.  I'm a huge fan.  I love the pink tint and shimmer.  ($ 30.00)
14.  Urban Decay Finishing Spray-  Ahhh.  This is my lifesaver.  I've sweated and been drenched in a rainstorm  and my makeup has made it through with this spray.  It's a setting spray to lock your makeup in.  It's sticky at first but you can't tell it's on after it dries.  ($ 30.00)